It’s the HUMP! How are you celebrating?? I had to be up crazy early this morning, so me and my chocolate croissant are just hanging out with a latte and calling it a morning. After reading the comments from Monday’s post, I just had to reflect on how fabulous each of you are, you gloriously fabulous readers of Coming Up Roses. Seeing you comment vulnerably and tell your own stories and share your own emotions with me and with the whole little family here – it’s awesome. And it further inspires me to live presently and follow my own dreams, and for that I can’t thank you enough!
And with that, something totally light-hearted and springy and fruit-themed and fun. Fruit is “in,” right?
Of course, fruit is always “in.”
Something new around these parts…a DIY post to make ridiculously cute and comfy watermelon shoes! #yes
These babies are EAAAASY to make – and that’s coming from a girl who’s pretty challenged in the Pinterest-able DIY department. But this one? I have a feeling you’ll be wanting to pin for a new weekend project!

First and foremost, the supplies. You’ll need shoes – guess that’s a no-brainer, huh? I got these red Ked lookalikes from Target for about $15.
Next up? Paint (I used green acrylic!), paintbrushes, tape, a black fabric marker, and a clear acrylic paint sealer spray. That’s it. Just like in the good ol’ arts n’ crafts days, make sure you’re working on newspaper if you want to keep your workspace clean! Especially if you’re like me and spill virtually everything on virtually anything. #talented

Start by applying tape around the perimeter of your shoes, overlapping onto the white rubber where that first little ridge lies. Since my tape is clear, I used a permanent marker to draw on top of the tape where it overlapped on rubber to ensure all of my lines ended up clean and neat. This also helps you visualize your end product and keep things even – you’ll be painting green beneath this, to get that hint of white before the watermelon rind!

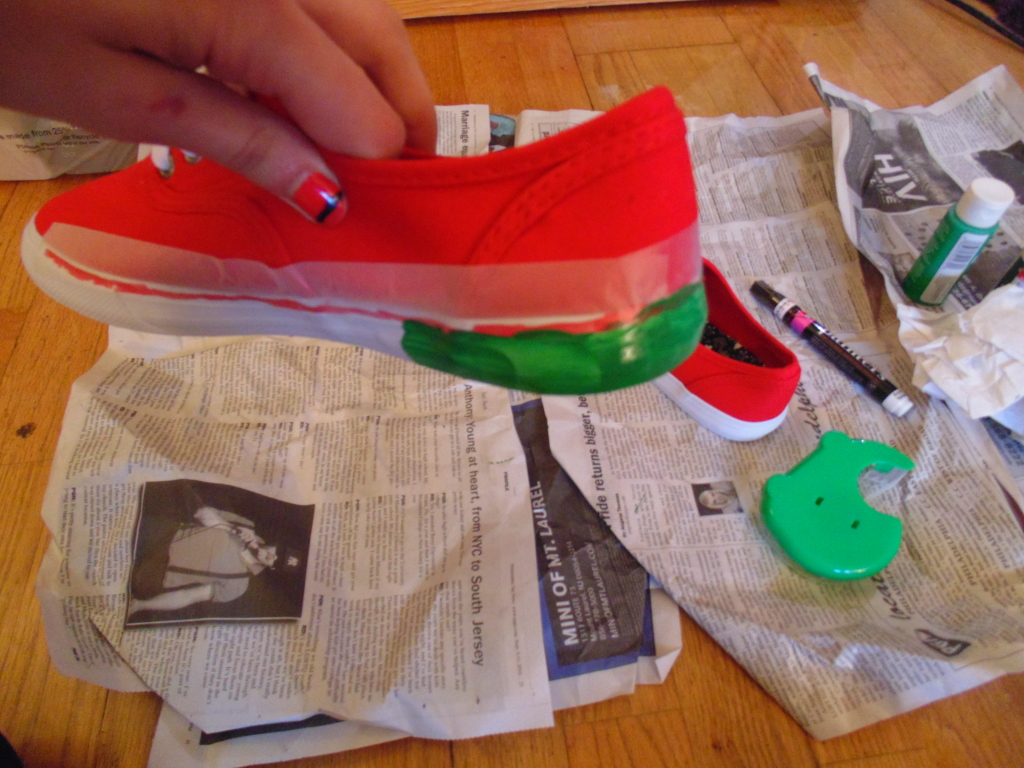
Once you’re all taped up, begin painting green onto the rubber of your sneaks. Try to get the coloring as even as possible without laying the pain on too thick, or you risk having it chip away or get all goopy and gross. Go around the whole perimeter, let it dry, and go around for a second coat. Make sure you let everything dry overnight. Once they do, you might notice some crackling paint or chips on any spot that might’ve gotten a bit too thick with paint. No worries! We’ll address that in a sec.

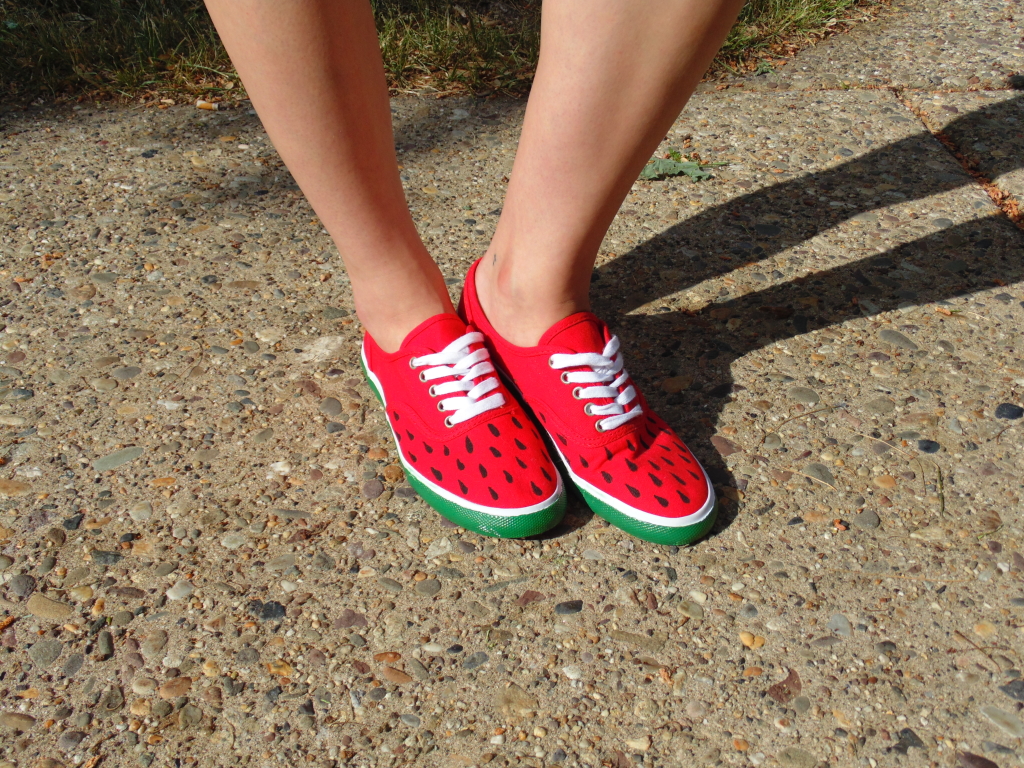
First, time for some SEEDS. Pick up that black fabric marker we talked about earlier and draw teardrop shapes all over the top part of the shoe. You have creative liberty, though, so feel free to take them as far back as you see fit. I followed the natural seam of the shoe and just left it at that.

Last step: Once everything has dried, you’ll want to touch up any chipped green spots with dabs of green paint. Then pull out that acrylic sealant spray and head OUTSIDE. Definitely hit the great outdoors for this step (or at least a patio away from nice things), since you probably don’t want sticky or stained walls. Just lookin’ out.
I used a piece of cardboard and had my momma help me hold it, covering the red canvas of the shoe to get the sealant *only* on the painted rubber. This will just make your watermelons last longer, since your sneaks were made for walkin’!
AND VOIIIIILA! That’s literally it. Literally. You’ve got yourself some super cute and en trend shoes for spring.


Holy Chic tee: LuluSimon Studio // Black chiffon ruffle shorts: Urban Glitter Boutique (Get 20% off with code ROSE20) // Sunnies: Polette
Will you be making some watermelon shoes for yourself? What’s your favorite DIY project for spring/the DIY-challenged???
I hope you’re still living by Monday’s mantra…not living like tomorrow is promised, seizing the crap out of every single day, just being the baller that you are…you know the drill. (;